We always recommend nicecast for mac users which the software and support for this product can be found here�.. http://www.rogueamoeba.com/nicecast/
In order to setup Nicecast please follow the instructions for Nicecast. these can be found below;
�
How To Broadcast To An External Server

Beginners will likely wish to use Nicecast's easy built-in server. However, for more advanced users, Nicecast also offers the ability to broadcast to an external server, such as a remote copy of Nicecast, a remote icecast/shoutcast server, or a relay server from a company such as Zoe Networks.
Overview
1. Set up Nicecast as in the Basic Setup tutorial.
2. Open the Server window, click External in the drawer, and create a New server.
3. Highlight the server, and adjust the settings as needed. Finally, switch the radio button in the drawer.
4. Click Start Broadcast in the Broadcast window. You're on the air, using your external server!
Details
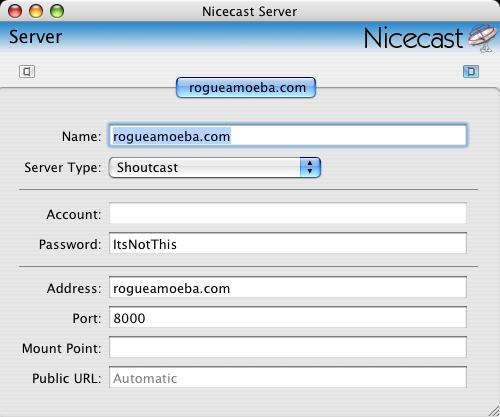
Once the Broadcast portion of Nicecast is set up, as in our Basic Setup tutorial, you simply need to adjust the settings in the window seen above. Open the Servers window (press Command-2 or use the Window Menu) and open the drawer by clicking the drawer buttons on top of the window. Click the External folder, then press New to create a new Server setup. This setup will be used to access a remote server.
Now you need to fill in the fields with the appropriate information. This information is all relative to your remote server, except for the name, which can be anything you like. Fill in the Server Type popup, which adjusts various under-the-hood settings and provides the proper URLs to the Stream Tracker and the Share drawer. The Account is only needed for some server types - if it's grayed out, you may ignore it. However, a password for the server will be needed. This password shouls already be known to you.
Now you need to enter the actual information about the server. The Address and Port should also be known. The Mount Point setting is only for icecast servers, so leave this alone if you're not using an icecast server. Finally, the Public URL may be adjusted manually if you desire. This will enable you to set a specific address through which listeners may tune in. This should generally be left at Automatic.
Once you have these settings set up properly, be sure to select the server in the drawer, using the radio button. Click Start Broadcast, and Nicecast will attempt to connect to the server. If it fails, it will provide an error. Otherwise, you'll now be broadcasting to an external server.
