Streaming with the Oddsock Oddcast DSP Plug-in:
Streaming with the Oddcast server is the most powerful way to stream your live or playlist based audio to a Shoutcast, Icecast, or Windows Media Streaming Audio Server. If you do not have one of these types of servers, you should contact us here at mediacast1 to start broadcasting, it is a very exciting and fun way to spread your music, voice, or any other audio content via the web.
To start off, lets make sure you have the essentials. In order to broadcast you should have the following components and/or software:
| Operating System |
� |
Windows 95, 98, ME, NT, 2000, or XP |
| Nullsoft Winamp 2.x (Winamp 2.9 recommended) Note: Although Winamp 3 does support the Oddsock plug-in, this particular version is not compatible with Winamp 3. |
� |
Download |
| Oddsock Oddcast DSP Plug-in for Winamp |
� |
Download |
| Access to a SleepyEngineers streaming audio server |
� |
Check your Welcome email from ZoeNetworks for details or Click here to order a plan. |
| Internet Access |
� |
Although you can broadcast with a 56k internet connection, a DSL or Cable connection to the internet is recommended for optimal performance. |
If you already have the above requirements, please continue in your reading. If you do not have the above requirements, you may read on but you may experience problems other than those addressed in this tutorial.
Lets begin. If you have not already done so, install Nullsoft Winamp and familiarize yourself with it. Also install the Oddsock Oddcast DSP Plug-in - you should not have to close Winamp to perform the installation.
Step One:
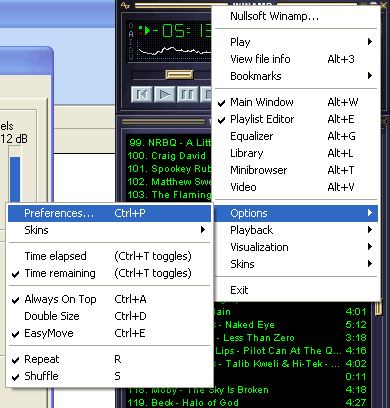
Begin by loading Nullsoft Winamp. Right click on the title bar that reads "Winamp" and mouse over the menu labeled "Options" then click on the option labeled "Preferences". You may also press CTRL-P on your keyboard. [See figure 1.1]
Figure 1.1 - accessing the Nullsoft Winamp Preferences dialogue:
Step Two:
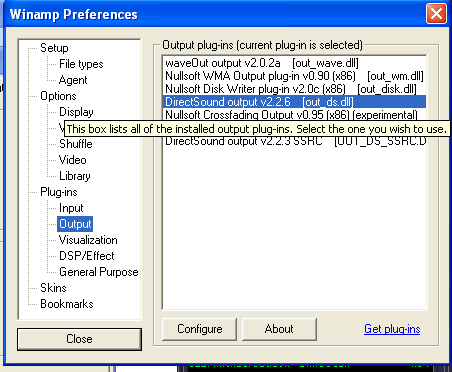
Now that you have opened the preferences dialogue, click on the item to the left side of the dialogue labeled "Output" under the Plug-ins category. This part is pretty much up to you depending on the sound you want. If you select the standard "waveOut output", you will experience minor moments of silence in between songs. You do not want to select the options labeled "Nullsoft WMA Output plug-in" or "Nullsoft Disk Writer plug-in" as these will create copies of the songs you attempt to play in different file formats on your hard drive. Our recommendation would be to use the "DirectSound output" or the "Nullsoft Crossfading Output" but for the purposes of this tutorial we will be using the DirectSound output. Note: if you do not have a soundcard installed on your computer, you will need to select the "Nullsoft NULL Output Plug-In" which will allow you to stream the music without getting error messages because Winamp was unable to find a soundcard. If you wish to follow along with the tutorial, select the plug-in labeled "DirectSound output" as that is what we will be using as an example. [See figure 1.2]
Figure 1.2 - Choosing your output plug-in:
Step Three:
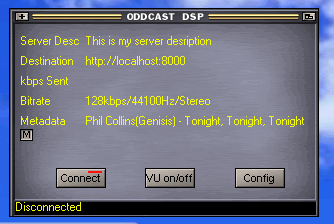
Now you must enable your Oddcast DSP Plug-in. To do so, choose the item labeled "DSP/Effect" under the Plug-ins category. Upon doing so you will have two options (considering that you have not installed other DSP plug-ins) which are "(none)" and "oddcast DSP v2". You will of course want to select the plug-in labeled "oddcast DSP v2". You may now close the preferences dialogue. A new dialogue window should have opened with a title that reads Shoutcast Source. [See figure 1.3/1.4]
Figure 1.3 - Selecting the Oddcast DSP Plug-in:
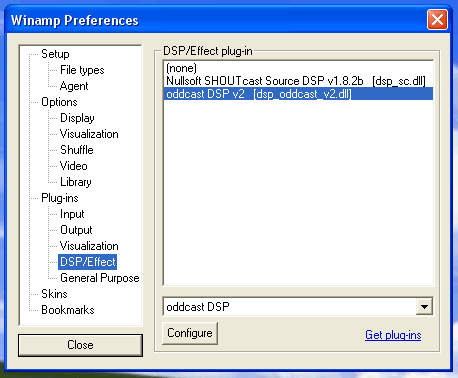
Figure 1.4 - A new dialogue window titled "ODDCAST DSP" appears:
Step four:
You are now ready to setup the Oddcast DSP Plug-in to broadcast to your mediacast1 streaming audio server. For this and other steps, you must know your server address, port, and password. The information entered into this tutorial should not be use as you will not see productive results. To start, click on the button that reads "config". [See figure 1.5]
Figure 1.5 - Oddcast DSP Plug-in configuration:
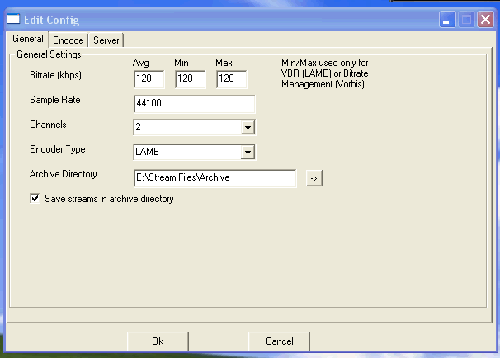
Before filling in the configuration fields, you will need to figure out at what bitrate you wish to broadcast. If you do not know the maximum bitrate your Sleepyengineers server supports, you should contact your Sleepyengineers representative. Most high-speed servers broadcast at 128 kbps (kilo-bits per second) but there streams cannot support dial-up listeners. Most low-speed servers broadcast anywhere from 16 kbps to 32 kbps and allow almost any internet connection to stream there audio. If your Sleepyengineers server supports multiple bitrates, you should fill in this information according to your target audience. You may wish to set your average bitrate to 64, your minimum to 32 and your max to 128 this way your stream will support almost any internet connection. For this example we will use 128 for all settings. Please note: you are subject to account termination if you set your bitrate to higher than the plan you are paying for. For example, if you are paying for streaming audio at 24 kbps and you set this setting to 128 your account may be disabled or terminated. Before you set your bitrate, make sure you have consulted your Sleepyengineers representative to make sure and check what bitrate your server was setup for.
Your sample rate should always be set to 44100 for best sound quality and performance.
Unless you wish to broadcast in mono format (not recommended) you should leave the setting labeled "Channels" set to 2 which is the setting for stereo broadcasting.
Encoder Type:
This setting should be set depending on what type of server you are using. If you are paying for a Windows Media server, you should set this setting to WMA which stands for Windows Media Audio. If you are using a simple Shoutcast or Icecast server you should set this setting to LAME or if you have a streaming audio server that supports OGG Vorbis you should select OGG as the encoder type. You may need to contact your Sleepyengineers representative for information on what types of streaming your server supports.
Some radio stations archive their broadcasts for later playback over the air or to keep in a listener or staff-only archive. If you wish to archive your broadcasts, you should enter or browse to the path where you wish to store the stream files. This directory must already exist or you must create it outside of the Oddcast configuration. [See figure 1.5, above]
Step five:
You now need to set more settings for how your broadcast is going to encode. Click on the tab labeled "Encode" [See figure 1.6]
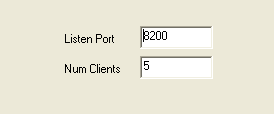
In this example, we will show you how to setup Ogg Vorbis streaming. You should select the tab labeled "OggVorbis" and set the quality to the appropriate setting. We recommend anything from 8 to 10. If you are streaming with the Lame encoder, the settings are pretty self explanatory. We recommend setting the quality for Lame encoding to anywhere from 8 to 10 as well. Streaming with Windows Media Audio will require the knowledge of your "listening port" which you will need to contact your Sleepyengineers representative for access to. Windows Media Audio streaming requires that you set the max number of clients who can connect to your broadcast. You should contact your Medicast1 representative to see how many clients you are allowed to support and set this setting accordingly. Please note: although you can specify "Bitrate Management" as the encoding type for OggVorbis streams, this feature is not supported by Sleepyengineers for quality reasons. DO NOT SET THE ENCODING TYPE TO "Bitrate Management" OR YOUR STREAM MAY NOT FUNCTION PROPERLY. Instead, use the Quality setting for your broadcasts, as we have done below.
Figure 1.6 - Encoder configuration, Ogg Vorbis:
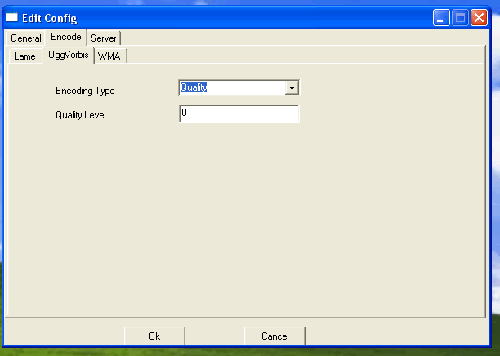
Figure 1.6.1 - Encoder configuration, Lame:
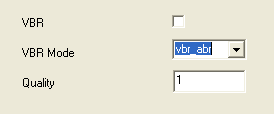
Figure 1.6.1 - Encoder configuration, Windows Media Audio:
Step six:
We are now ready to set our server settings. Click the tab that is labeled "Server". [See figure 1.7]
Figure 1.7 - Configuring the server settings:
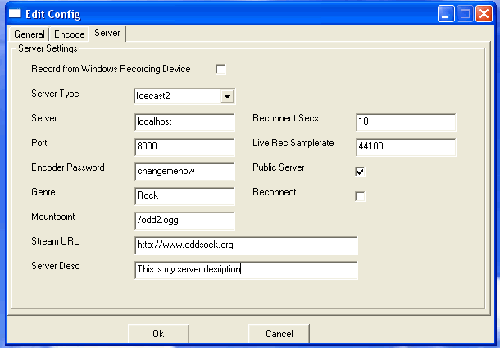
If you are broadcasting a playlist of MP3s and will not use any other sources such as a CD or a microphone, you should leave the field labeled "Record from Windows Recording Device" unchecked. If you wish to broadcast whats playing through your soundcard (ie, a CD, MP3, Wave Sound, Microphone, external mixer, etc) you should check this option.
Your server type can be obtained by contacting your Sleepyengineers representative. If you already know what server you have, you should choose the appropriate one from the drill-down list.
Under the field labeled "Server" you will need to enter the address of your Sleepyengineers server. This should not include a http:// or www prefix. An example of a correct address configuration would be yourhost.com or 127.0.0.1 . If you are unaware of what your servers address is, you should contact your Sleepyengineers representative.
The port setting should also be assigned to you by a Sleepyengineers representative. This is a series of numbers and can only be numerical. If you enter any form of character besides a number, or if you enter the wrong port number your broadcast will not function.
The encoder password field should be set to the password that you specified when creating your Sleepyengineers account. This also may have been assigned to you by a Sleepyengineers representative. You must enter the valid password or your broadcast will not function.
The field labeled "Genre" can be anything you specify but should somehow pertain to what you are broadcasting. You could say for example, "Talk Radio" or "Talk" for a talk radio show or "Adult Contemporary". Although you can input anything into this field, a pointless entry would be something such as, "Music" or your website URL.
The mountpoint section of the server configuration is one of the most important pieces and must be properly setup. Even if everything else on this page is correct, if the mountpoint is blank or incorrect you will experience problems. If you are unaware of what your servers mountoint is, contact your Sleepyengineers representative for information on what your mountpoint is. For this example, we will be using /odd2.ogg. Your mountpoint will probably end in .ogg but the prefix will most likely be something other than odd2. Please note: if you do not preceed your mountpoint with a / (for example, /my.mountpoint) your broadcast will not function.
The Stream URL field is optional but should you choose to fill it in you should fill in your website URL. If you do not have a website, or do not wish for others to see what your website URL is you should use something such as http://www.oddsock.org . Some also choose to enter a URL that pertains to the topic of their broadcast. For example, if you were doing a talk show about used cars you may wish to enter the URL " http://www.cars.com ".
The field labeled "Server Desc" you should fill in the description of your broadcast. This could be something like "The best rock on the planet" or "Talk radio that stimulates your mind" or something to that effect. This can be anything you choose but it should in some effect describe your broadcast.
The field labeled "Reconnect Secs" is the amount of time, in seconds that you wish for Oddcast to reconnect to your Sleepyengineers server in the event that you lose your connection. If you set this field to zero, your broadcast will immediately try to reconnect for as long as it takes to do so. If you set this setting to 10 or any other number, it will wait that long in seconds to try and reconnect to the server.
The field labelled Live Rec Samplerate should almost never be changed from 44100. This option allows for best recording and playback quality for your listeners.
The field labeled Public server will allow (if checked) for your server to be listed on a public radio listening similar to http://www.shoutcast.com which will allow you to attract more listeners. If this is checked, make sure your server description, genre, etc. is all filled in how you want your listeners to see it on the directory.
Finally, the field labeled "Reconnect" should be checked if you wish for Oddcast to attempt to reconnect to the server upon disconnect. You will also need to set the field labeled "Reconnect Secs" to your desired setting (see above).
Step seven:
If you checked the option labeled "Record from Windows Recording device" from above, you should follow the instructions below to setup the input to Oddcast.
Select the windows mixer from your start menu under accessories or select and double click the icon next to your clock on your start bar.
When using the windows mixer, you will need to go to options >> properties and select the radio button labeled "Recording" and press ok. You should then follow the steps below.
Under the Mic Input field, select which input on your sound card you will be using as your source. If you are using a standard computer microphone, you should select Microphone. If you are using a mixer board, an external CD Player, or some other form of sound that is not plugged into your Microphone input on the soundcard, you should select Line Input as your Mic Input.
You should now click the button to the right of the field labeled "Mic Input" that reads "Open Mixer". This will bring up the Windows mixer which will allow you to configure your sound card. You must make sure you have checked the option under your soundcards Recording Control labeled either "Stereo Mix, Wave Mix, What you Hear, etc.). You will need to consult your soundcards documentation if you can not find a similar option. [See figure 1.10]
Figure 1.10 - Configuring your soundcards mixer/record settings:
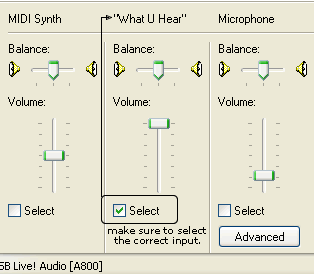
Because all soundcards are not all the same, your soundcards configuration and/or wording may be different than the one shown above. You should consult your soundcards documentation if you have problems setting this up.
After you have made this configuration, you may close Windows Mixer.
Step eight:
Congratulations! You are now ready to connect to your streaming audio server and test your broadcast settings. You may do so by closing the configuration dialogue and choosing connect. Upon successful connect the red light on the connect button will turn to green.
Happy streaming!


